
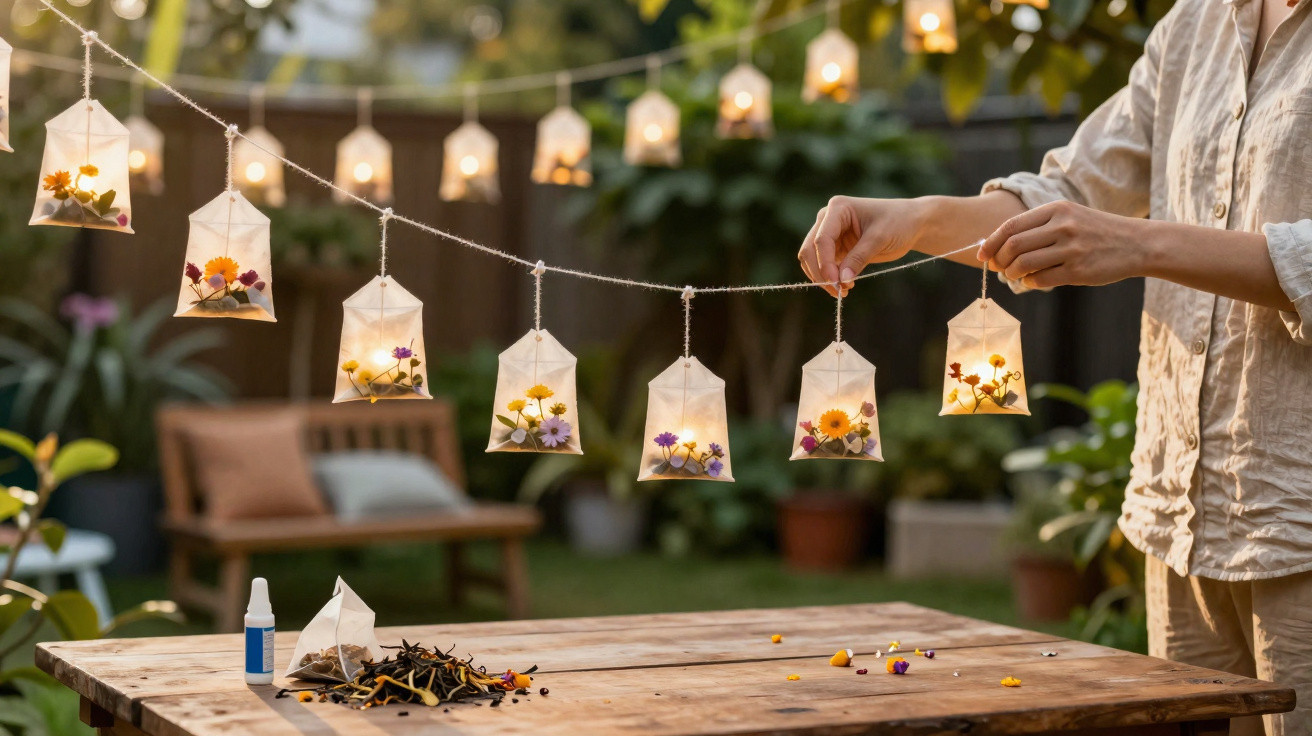
For anyone sitting on the terrace in the evening, atmospheric lighting is often a must – but without spending a fortune on solar fairy lights and designer lanterns. A DIY idea from the UK now shows how used tea bags can be turned into romantic mini lanterns, bathing the garden in a soft golden glow for almost nothing.
How tea bags become glowing garden art
The principle is remarkably straightforward: paper tea bags already offer the ideal shape and size for small illuminated panels. Once dry, they take on a slightly translucent amber appearance that filters light pleasantly. This is precisely the quality used by DIY creator Sibia Torres Padilla, known on Instagram as @Sibster. Her video showing how she makes romantic garden lanterns from used tea bags has been shared countless times and watched millions of times.
In just a few steps, a throwaway item becomes an atmospheric light source that can easily replace expensive garden lights.
Many people have already said that they keep a glass beside the teapot, where they collect used tea bags, rinse them out and save them for later. This turns the daily tea ritual into an ongoing little craft project for the next garden party.
Step by step: make a tea bag lantern
You will need at least eight used paper tea bags for a small lantern. The more you combine, the larger the light can be. Preparing them takes a little patience, but the remaining steps are surprisingly simple.
Materials for a tea bag lantern
- used paper tea bags, emptied and rinsed
- white craft glue or wood glue, diluted with a little water
- pressed flowers, leaves or flat paper confetti
- thin wooden sticks, lolly sticks or straight twigs
- LED tealights or a small battery-powered string of lights
Preparing the tea bags
First, carefully open each tea bag along one side. Do not tear the paper edge all the way through, otherwise the finished panel will be less stable. Next, shake or spoon out the still-damp tea leaves, then briefly rinse the empty bag under running water. Important: lay the tea bag out completely flat afterwards and allow it to dry thoroughly, so that mould cannot form.
Once dry, small irregular brown marks will remain – and these stains are exactly what gives the finished lantern its warm, vintage look.
Sticking on floral designs and making the frame
Next, coat the tea bags with a thin layer of diluted glue. Carefully place the following on the glued surface:
- pressed flowers from the garden,
- small fern leaves,
- fine grasses, or
- confetti and punched-paper motifs.
Everything should be as flat as possible, so the paper does not tear. Apply a second thin layer of glue over the top. This creates a kind of transparent protective coating. Leave the tea bag panels to dry well again, until they feel firm and slightly stiff.
The next stage is framing them: cut wooden sticks or lolly sticks to match the edges of the tea bags, then glue them around the outside like a picture frame. Four of these panels will later form a small open column. A hot glue gun is particularly suitable for assembling it, as the glue sets quickly.
When each panel is treated like a miniature art print, the result is a lantern that looks more like something from a craft market than a reuse project.
Place an LED tealight or a small string of lights at the base of the completed column. One rule is essential: never use a real candle. Paper catches fire quickly, so only electronic light sources should be used.
Where tea bag lanterns look best in the garden
These paper lanterns work particularly well in dry, sheltered spots. They do not cope well with direct moisture or strong gusts of wind. Good locations include:
- a covered terrace table for a summer dinner,
- sheltered windowsills,
- steps and stair landings on mild evenings,
- hanging beneath a pergola or balcony with some overhead cover.
Many keen gardeners only put the lanterns outside for the evening, then bring them indoors again afterwards. This helps them last considerably longer, even though they are made from several layers of thin paper.
There are almost no limits when it comes to design. Alongside floral patterns, you can cut small silhouettes from black paper – cats, birds or leaves, for example – and light them from within. This creates shadow pictures reminiscent of paper-cut artwork.
Creative versions for families, children and decoration lovers
In many homes, making a tea bag lantern quickly becomes a shared afternoon activity. Children can arrange colourful confetti, stickers or small paper stars, while adults take care of the scissors, glue and frames. The LED lights are safe and can be switched on and off by children themselves.
It becomes especially interesting when every family member creates their own design:
- parents can choose understated flowers and natural shades,
- children may prefer colourful dots, hearts or comic characters,
- guests at a party can make their own lantern as a keepsake.
The result is a small collection of individual light decorations that can be combined to suit the occasion – from a romantic evening for two to a garden party with plenty of friends.
What to consider: durability, safety and sustainability
The lanterns are made mainly from paper and wood, so they are not suitable for prolonged rain or winter storms. If you want to enjoy them for a long time, keep the following in mind:
- Store them dry: After use, keep them somewhere airy and dry.
- No naked flames: Use LED lights only, never real tealights.
- Clean tea bags: Remove all traces of moisture and tea leaves to prevent mould.
- Check stability: Before every use, briefly make sure that the frame and glued joints are still secure.
Tea bag lanterns have two environmental benefits. First, they significantly extend the useful life of a tea bag. Second, they reduce the need for new decorative products, which are often plastic and may last for only one season. Anyone who drinks tea every day will gradually collect craft materials for the next garden project without even trying.
Why tea bags work so well as light filters
The effect comes not only from their colour, but also from the paper's structure. Tea bag paper is fine enough to let light through, yet dense enough to diffuse it softly. Rather than producing a harsh point of light, it creates a gentle, even glow. The brown tea marks act like an inbuilt colour filter, producing the characteristic golden light that many people associate with summer evenings and candlelight.
If you would like to experiment, compare different varieties of tea. Black tea often leaves stronger, darker marks, while herbal tea is often a little lighter. This makes it possible to combine different shades, from delicate beige to an almost honey-coloured tone.
More upcycled garden lighting ideas
Tea bag lanterns fit perfectly into a trend seen in many homes: decorations are becoming more personal and are made from everyday objects that would otherwise end up in the bin. If you enjoy the technique, it can be combined with other upcycling ideas:
- use jam or sauce jars as tealight holders,
- repurpose old timber strips or pallets as stands for tea bag lanterns,
- add dried orange slices, cinnamon sticks or herb stems as extra decoration.
In this way, a completely personal garden lighting scheme develops step by step – far removed from standard fairy lights bought at a DIY store. Every lantern carries a small story: where did the flowers come from? Who stuck them on? Which tea break did the bag come from? It is this blend of memories, handiwork and soft light that makes the idea so appealing.

Comments
No comments yet. Be the first to comment!
Leave a Comment