
Whether it’s a designer dining table or a budget coffee table from a flat-pack shop, that pale streak on dark timber catches your eye and won’t let go. You wipe it, rub at it, and quietly blame the chair, the children, the cat, or yourself. The mark refuses to shift. Before long you’re picturing repair bills, or deciding you’ll simply live with it and try not to look.
I saw a friend tumble into that exact spiral on a rainy Sunday afternoon. Her oak table - her pride and joy - had just met the sharp corner of a toy lorry. She sighed, vanished into the kitchen, and returned not with pricey polish but with… a walnut. What happened next looked almost like a visual sleight of hand.
Because the scratch genuinely did fade - almost straight away.
Why a simple walnut can outsmart your most stubborn scratch
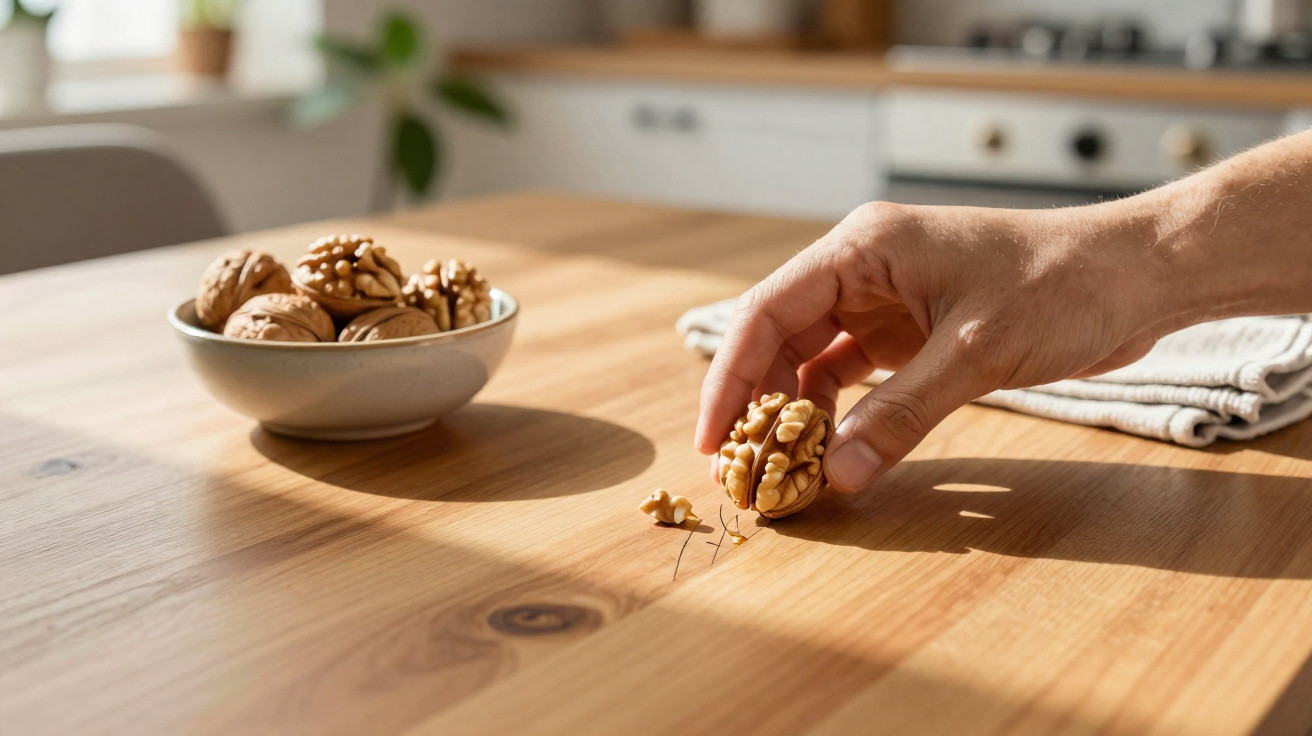
The first time you watch a walnut “fix” wood, your mind takes a moment to process it. You take an ordinary half-nut, run it over the scratch, and the chalky line shifts - darker, softer, less shouty. It’s unexpectedly satisfying, like colouring in a gap that never should have existed.
Under your fingertips you feel the contrast between the nut’s slightly gritty surface and the smooth timber. There’s a faint, earthy scent. The mark that kept stealing your attention starts to merge back into the tabletop, as though the wood is absorbing something it lacked. You’re not truly repairing the timber, but you are changing what you see each time you walk past - and that in itself feels like a small win at home.
In practical terms, this walnut hack has been doing the rounds for years in DIY forums, home blogs, and time-sink TikTok feeds. People try it on coffee tables, sideboards, stair spindles, even the edges of old wardrobes. Some share dramatic “before/after” videos; others upload blurry snapshots with a simple line: “Didn’t think this would work. It did.”
One US home-improvement survey reported that more than half of respondents had attempted at least one “food-based hack” on furniture, from mayonnaise for water rings to olive oil on dried-out boards. The walnut method sits firmly in that same kitchen-to-toolbox category: inexpensive, fast, and - if we’re honest - a little bit rebellious, mending something “proper” with something you might otherwise snack on while scrolling.
The reason it works is almost too straightforward. Walnuts contain plenty of natural oils. When you rub the nut over a scratch, those oils soak into the exposed, paler wood fibres where the finish has been scraped away. That fresh oil darkens the bare patch, pulling it closer to the surrounding stain or varnish.
On darker timbers - such as walnut, mahogany, or deep-toned oak - the change is often more noticeable because the contrast is stronger. The scratch looks white or washed out, the oil adds warmth and colour, and your eye stops shouting “damaged!”. You’re not rebuilding the protective coating or removing deep gouges, but you are disguising the flaw. It’s closer to make-up than surgery - and that’s perfectly fine.
How to use a walnut on scratched wood without making a mess
The process is almost comically simple. Take a raw walnut, crack it, and hold one half in your hand. You need the inner nutmeat, not the shell. Lightly rub it along the scratch, moving with the direction of the grain. There’s no need to press hard - you’re not sanding; you’re oiling the surface.
After a few passes, you’ll usually see a thin, slightly oily trace where the pale line was. Leave it for a minute or two so the timber can absorb the oil. Then use a soft cloth or an old cotton T-shirt to buff the area gently. Small circular motions tend to work well. The extra oil blends out, the sheen evens up, and the scratch often melts into the background. For more persistent marks you might repeat the steps once, but that’s generally all it takes: no special kit, no overnight curing, and no chemical smell hanging in the room.
A few friendly cautions are worth noting. To begin with, this won’t solve every problem. If the wood is deeply gouged, chipped, or split, you’ve moved into proper filling and repair - not a quick “hide and blend”. And if you have a nut allergy, avoid this altogether and use wax repair sticks or touch-up pens instead.
On very light timbers - pine, beech, or pale oak - a walnut can sometimes leave an uneven patch or a slightly grubby tone rather than a seamless blend. Try it somewhere discreet first, such as the back of a leg or the underside of a shelf. Let’s be honest: nobody does that every day, but with this hack, a quick test can prevent a bigger regret.
“I used to panic over every new scratch,” a London renter told me. “Now I reach for a walnut before I reach for my wallet.”
It’s easy to overlook the emotional side of this tiny ritual. On a stressful day, quietly making a mark less visible can feel strangely grounding. You’re not only tending to furniture; you’re reclaiming a little control in a busy, slightly chaotic home. And in purely practical terms, some homeowners even do this before putting a flat on the market or hosting a big family get-together, softening years of wear without calling in a professional.
- Use: raw walnut halves (no shell) on small surface scratches
- Best for: darker stained furniture, edges, chair legs, table tops
- Avoid: very light woods, deep gouges, or nut allergies
- Finish with: gentle buffing using a clean, soft cloth
What this tiny hack really changes in how we live with our stuff
Once you’ve watched a scratch fade under your fingertips, it can change how you view your home. The table stops feeling like a delicate, untouchable object and starts looking like what it was always meant to be: a surface you actually live around. Meals, laptops, keys dropped too quickly, homework, coffee rings. The walnut trick doesn’t erase a piece’s lived-in history; it simply takes the harshness out of the worst marks.
There’s also a quiet satisfaction in using something so ordinary and unbranded. No packaging, no glossy claims on a bottle, no “miracle formula” in bold print - just a kitchen staple doing a small repair job. In a world that nudges us to replace or upgrade at the first flaw, there’s a subtle act of resistance in saying: I’ll try to mend this first.
On a broader level, these small interventions encourage a different relationship with the things we own. Rather than waiting until something is “ruined”, you keep it decent as you go. A walnut here, a soft cloth there, perhaps a bit of wax occasionally. For a bookcase, that might buy another year before it starts to sag. For a hand-me-down table, it might be the difference between passing it on with pride or leaving it on the kerb. At a human level, it’s a reminder that wear and tear isn’t failure - it’s just life, slightly polished.
| Key point | Detail | Why it matters to the reader |
|---|---|---|
| Where the “walnut trick” comes from | Natural walnut oils soak into the wood exposed by the scratch and darken it almost instantly. | Understanding why it works helps you decide when to use it - and when to avoid it. |
| Limits of the method | It’s most effective on shallow scratches and darker timbers, and far less useful on deep chips or very pale wood species. | Helps prevent disappointment and avoids nasty surprises on sensitive or expensive furniture. |
| Simple gesture, psychological effect | A seconds-long ritual with no chemicals or tools that makes a scratch less noticeable day to day. | Restores a sense of control over your space without taking on major work. |
FAQ:
- Does the walnut trick work on all types of wooden furniture?
Not universally. It tends to work best on darker timbers and on surfaces where the finish is scratched but not completely compromised. On very pale wood or high-gloss lacquer, results can look uneven or barely show at all.- How long does the walnut scratch repair actually last?
It isn’t permanent. Over the following weeks or months, the oil can fade or be cleaned away, and the scratch may become more noticeable again. You can reapply it when required, or later use proper wax or a touch-up pen.- Can I use any nut, or does it have to be a walnut?
Walnuts are the usual choice because they’re fairly soft and rich in oil. Some people try pecans or almonds, but outcomes vary. For the most reliable result, use plain, raw walnut halves.- Is it safe to do this on antique or high-value furniture?
With valuable antiques, professional restorers generally prefer specialist products or expert care. A walnut is mild, but any DIY approach carries some risk, particularly for historically important pieces.- Will this trick fix deep gouges or chipped corners?
No. A walnut darkens exposed fibres but doesn’t replace missing material. Deep damage usually needs filler, sanding, or professional repair. This is a cosmetic touch-up, not a structural fix.




Comments
No comments yet. Be the first to comment!
Leave a Comment