
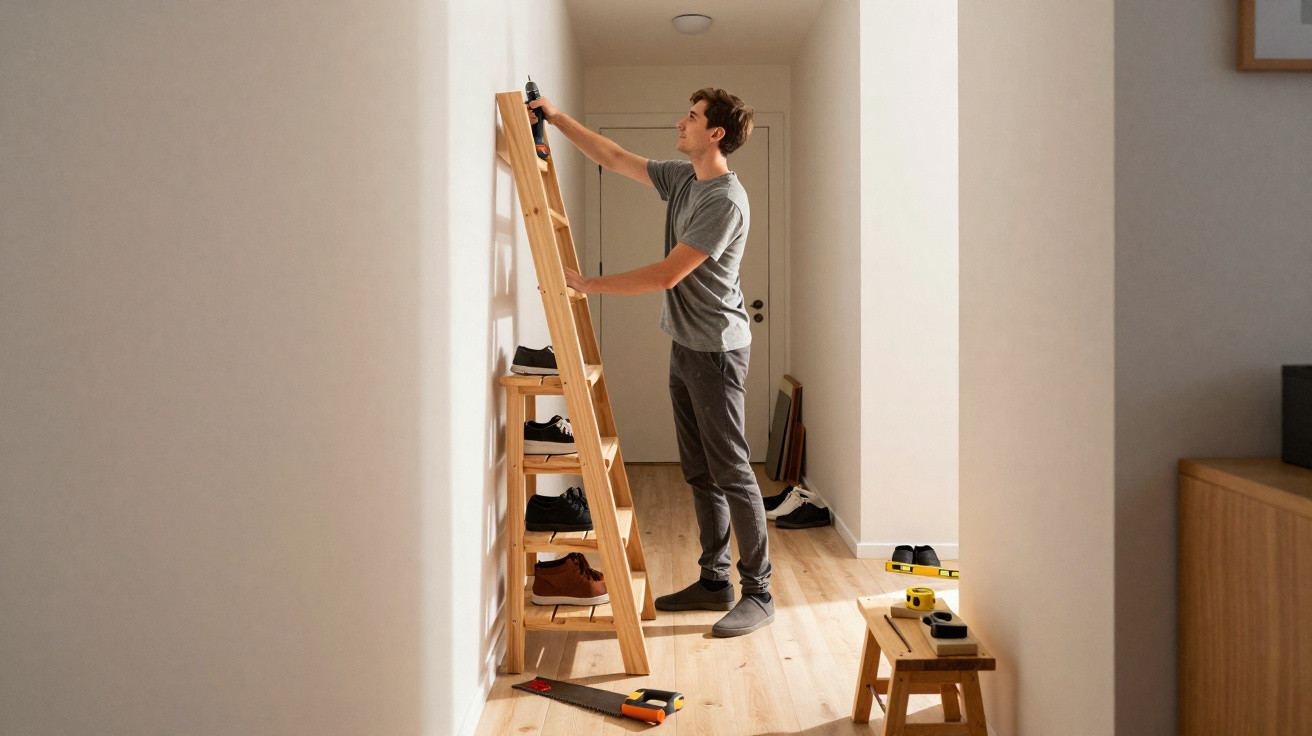
Many flats share the same headache: a tiny entrance, barely any surface space, and a pile of shoes that seems to grow every day. If you want both tidiness and safety, you need a piece of furniture that fits your own layout precisely - without swallowing half the hallway. The good news is that, with a few offcuts and basic tools, you can make a sturdy, almost free shoe rack that clears the floor and helps prevent trips.
Why a clever shoe rack can transform your hallway
Even a narrow passageway just four metres long and one metre wide is enough for a handful of shoes to seriously choke the walkway. In city flats of 20 to 30 square metres, the entrance quickly turns into a trip hazard - especially when you are trying to get through with shopping bags or a pushchair.
"A narrow, well-thought-out shoe unit lifts shoes off the floor, creates visual calm and significantly reduces the risk of falls."
Interior designers often recommend furniture only 15 to 20 centimetres deep for tight hallways. That is plenty for trainers, low shoes and even many ankle boots, without noticeably narrowing the route through. If you build the rack yourself, you can use the available space right down to the last millimetre - rather than being forced to accept standard sizes from a furniture shop.
It is also ideal for using up leftover timber from older projects - roof battens, boards salvaged from retired shelving, or wood from pallets. That saves money, cuts waste and can result in something that feels far more solid than a cheap flat-pack cabinet made from chipboard.
Ladder-style shoe rack: sturdy, low-cost and quick to build
One particularly hard-wearing option borrows from a ladder-style frame. The principle is simple: two upright side pieces, with slanted shelves between them so shoes sit slightly tipped forwards. This keeps everything easy to see while keeping the overall depth very small.
Materials and tools at a glance
- Timber offcuts: for example boards (about 15 cm wide) or construction timber such as 40 x 60 mm
- Wood screws, and optionally wood glue
- Saw (mitre saw or handsaw)
- Cordless drill/driver with drilling function
- Tape measure, pencil, try square, spirit level
- Sandpaper or sanding block
If you have wide boards to spare, they can become the side panels and the shelves. If you are working with construction timber, you can build the sides like small ladders and then cover the rungs with battens.
How to assemble it step by step
For a classic free-standing rack with three levels and a height of roughly 90 to 100 centimetres, you can follow these steps:
- Cut two side panels to size (for example 90 cm long and 15 cm wide).
- Cut three shelves to your chosen width (for example 60 to 80 cm).
- If you want the shelves to be mounted on a slight tilt, you can optionally mitre the front edge.
- Mark out the shelf positions: the lowest shelf around 5 to 10 cm above the floor, the middle shelf halfway up, and the top shelf just below the top edge.
- Pre-drill and screw the shelves to the first side panel, then position the second side panel and screw it in place as well.
If you use construction timber, start by making one “ladder” for the left side and one for the right. Set the rungs so they tilt forwards at around 20 degrees. Cut angled ends on the rungs so they sit flush against the uprights. Then fix two or three narrow battens onto each rung to create a light, airy shelf surface.
"A slight tilt of around 20 degrees is enough for shoes to stand securely while keeping the depth loss to a minimum."
How to make the rack genuinely stable
To prevent any wobble, it is worth doing a quick stability check:
- Measure diagonals: if the corner-to-corner measurements match, the rack is square.
- A cross brace or a thin-board back panel noticeably increases rigidity.
- In homes with children, secure the unit to the wall using brackets.
If you clean the hallway often, set the feet a few centimetres higher so a mop or vacuum cleaner can pass underneath easily.
Wall-mounted rack with sliding shelves for ultra-tight spaces
If you need even more space back, a wall-mounted system is an excellent option: no feet, and shelves you can reposition by height. The floor stays completely clear, so a child’s bike or the vacuum cleaner can be stored underneath the shoes.
Making wooden support rails
Instead of buying costly metal rails, you can cut simple support pieces from narrow wooden strips. Typical dimensions are about 1.3 cm thick, 5 cm high and 25 cm long. Screw two of these strips horizontally to the wall, side by side - one pair on the left and one pair on the right - leaving a small gap between the two strips in each pair. These “pairs” form supports for square shelves.
Suitable shelves can be cut from boards around 25 x 25 cm and roughly 2.5 cm thick. You simply slide each shelf onto its supports. If you need more vertical room, move the shelf up by one slot. This way, every type of footwear can have its own zone:
- bottom level: trainers, children’s shoes or slippers
- middle level: low shoes and lighter ankle boots
- top: tall boots or pairs you do not wear often
Aligning and fixing the system safely to the wall
Start by marking a clean, level baseline using a spirit level. Screw the first set of support strips along this line. Then work upwards row by row, each time around 20 to 25 centimetres higher.
In an entrance area or shared hallway, it also pays to consider the rest of the fittings: does the top row still sit beneath the coat rack? Can you still access the front door area or any electrical consumer units? A simple cardboard strip used as a template makes it easy to test spacing before drilling.
In a cellar or garage, avoid placing the lowest row right on the floor. Setting it 10 to 15 centimetres higher helps protect shoes from damp and makes floor cleaning easier.
Preparing the wood properly: no splinters, no damage to shoes
Reclaimed timber often comes with dents and rough edges. A quick sand is usually enough to make it suitable for everyday use. Pay particular attention to the front edges and corners, rounding them slightly so delicate toe caps are not scuffed.
"Rounded, sanded front edges prevent pressure marks on leather and make the rack more child-friendly."
With very dry timber, small cracks or chips can appear. These can be filled with wood glue or filler. If you want a smarter finish, use clear varnish, wax or a wood stain. Lighter shades make a hallway feel more spacious, while darker colours create more contrast against pale walls.
Safety, load capacity and sensible planning
Shoes may not seem heavy, but several levels filled with winter boots quickly add up. It is worth checking three things:
- Screw length: Choose slightly longer screws so they bite deep into the wood.
- Wall type: Standard wall plugs work in concrete or brick, while plasterboard needs specialist cavity fixings.
- Loading: Put heavier footwear on lower levels and keep lighter pairs higher up.
Before you fix anything permanently, a rough plan on paper helps. If you account for how many people live in the home, the seasons and typical shoe types, you reduce the need for constant rearranging later. As an example, a family of four with summer and winter shoes can easily reach 20 to 25 pairs in day-to-day use.
Further ideas and useful add-ons
The “use offcuts instead of binning them” approach is easy to extend. A narrow board with hooks can sit between shoe rows for keys or a dog lead. A small box fixed on top can hold shoe polish, waterproofing spray and brushes. If you have high ceilings, use the upper area for rarely worn shoes stored in boxes or baskets.
The same idea works well in a child’s bedroom too: build a mini version, make it lower, and paint it in brighter colours. Children can reach their own shoes, learn to keep things tidy, and are less likely to trip over pairs left on the floor. For very young children, a non-slip mat in front of the rack is also useful so nothing slides around while they put shoes on and take them off.
An organised shoe system also helps households with allergies or pets: less street dirt is tracked through the home, and dogs or cats are less likely to grab wet laces or soles covered in grit and road salt. Combined with a washable doormat and a fixed spot for outdoor footwear, you can keep the entrance area more hygienic - without buying new furniture.



Comments
No comments yet. Be the first to comment!
Leave a Comment