
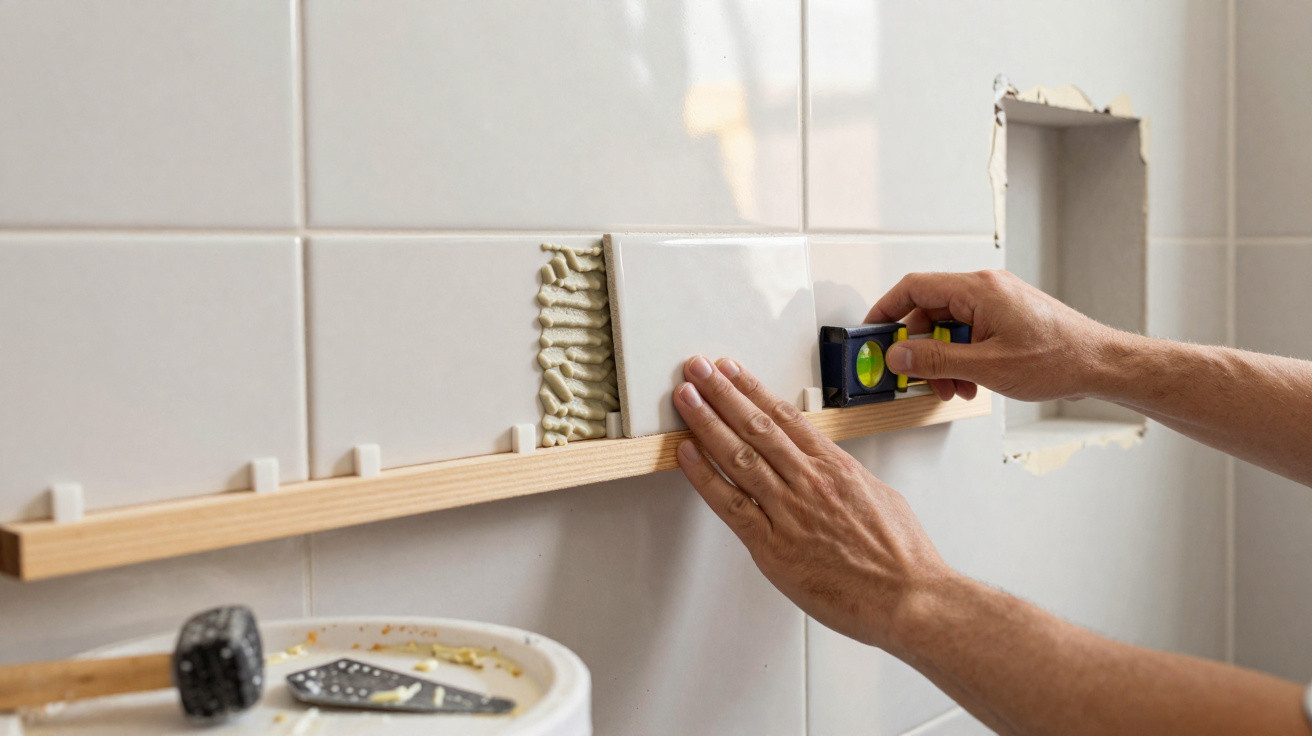
Many DIYers know the moment all too well: you’ve chosen the perfect wall tiles, you press them into place - and then they slowly, inevitably creep downwards. Frustration, sweat and uneven grout lines soon follow. With the right prep, the correct adhesive and a smart little trick using a simple timber batten, it’s surprisingly easy to stop the whole mess before it starts.
Why wall tiles love to slide while you’re fixing them
Adhesive that’s too runny - and beds that are too thick
The most common culprit is sitting right there in the bucket: tile adhesive mixed to the wrong consistency. Plenty of people thin it out so it spreads more easily. The downside is obvious on a vertical surface - the tiles effectively “float” and then gradually slump.
"The consistency of the adhesive should resemble a firm, mouldable paste that stays on the trowel and doesn’t run."
Another frequent mistake is applying an overly thick layer. The thinking is usually, “more will hold better”. In reality, it does the opposite: a thick bed behaves like a greasy film. Under the tile’s weight and gravity, the entire course can start to drift.
If you want to avoid tiles slipping, follow the manufacturer’s mixing ratio precisely. Measure cleanly, check the instructions again if you’re unsure, and mix for a little longer rather than tipping in extra water on impulse.
Choosing the right tile adhesive - why the C2 marking matters
Alongside consistency, the adhesive type is crucial. For wall tiling, it’s worth using a cement-based adhesive marked C2. That label means improved tensile adhesion strength - in plain terms, it grips harder, which is exactly what you want on a vertical wall.
It pays to read the bag twice. In particular, look for:
- C2 marking: enhanced adhesion, ideal for wall areas
- “Open time” of at least 20 minutes: enough time for adjustments
- Suitable for your material: ceramic, porcelain, natural stone
On top of that, levelling systems with self-clamping clips or classic tile spacers are genuinely helpful. They keep joints consistent and stop individual tiles from wandering while others are already starting to set.
The simple timber-batten trick as a mechanical stop
Why you should never start directly off the floor or worktop
Many people instinctively begin at the bottom - straight off the floor, the shower tray or the kitchen worktop. It sounds sensible, but it often leads to a wall that looks out of true. Floors and worktops are rarely perfectly level. Even a small height difference carries through row by row, and by the time you reach the top, the whole layout can look skewed - even if every single tile was placed neatly.
How to set up a supporting timber batten perfectly
The professional approach uses a temporary screwed-on timber batten (often called a batten or tasseau). This strip acts as a shelf for the first visible row of tiles and, in turn, supports everything above it.
Work like this:
- Using a spirit level, draw a perfectly level line on the wall at the height where the second row of tiles will start.
- Hold a straight timber batten (for example, a simple length of roofing batten) along that line.
- Fix the batten firmly to the wall with suitable screws.
- Check again with the spirit level: the batten must be dead level, or every row above will run out.
"This simple timber batten works like a mini scaffold: it carries the weight of the tiles and blocks any tendency to slip downwards."
From this point on, the first row you lay sits neatly on the batten. That takes pressure off the adhesive, keeps joints straight, and makes the whole job far less stressful.
Double-spreading adhesive for a ‘valve effect’ on the wall
Why double application is essential for larger formats
The larger the tile, the more demanding adhesion becomes. For bigger formats, professionals use double-spreading, often called buttering-floating: adhesive goes on both the wall and the back of the tile.
Here’s the method:
- Spread adhesive on the wall with a notched trowel (around 6 mm notch) and comb it into even ridges.
- Apply a thin coat of adhesive to the back of the tile as well.
- Aim to cross the ridges - for example, horizontal on the wall and vertical on the tile.
- Press the tile in firmly and move it slightly back and forth until it beds fully.
"By crossing the adhesive ridges, trapped air escapes more easily - the tile almost ‘sucks’ itself into place and stays stable exactly where it’s set."
Used properly, this gives near full coverage, reduces voids, and significantly lowers the chance of cracking or hollow spots developing after a few years.
How to secure a professional finish like a tiler
Patience as the secret weapon: wait 24 hours before the bottom row
Once the upper section of the wall is tiled, most people feel the urge to crack on: whip the batten off and quickly complete the bottom row. This is the point where many jobs either succeed - or turn into a headache.
Tile adhesive needs time to fully cure. The guideline values in EN 12004 and the instructions on the bag aren’t there for decoration; they’re key to durability. A practical rule is: at least 24 hours of drying time before you remove the batten.
Only after that period has passed does the wall genuinely carry the tiles on its own. Then you can unscrew the batten safely and take your time fitting the bottom row - including all the cuts around the floor, shower tray or kitchen worktop.
Your checklist for wall tiles that don’t slip
The most reliable way to stop tiles sliding comes down to four straightforward steps, carried out consistently:
- Choose a quality adhesive with a C2 marking that offers strong grab and sufficient open time.
- Fit a straight, temporary timber batten to support the first visible row and keep everything lined up.
- Use double-spreading with a notched trowel to press tiles onto the wall with minimal trapped air.
- Stay calm and allow curing time before you start the bottom row and the finishing work.
Extra practical tips for a long-lasting tiling job
Check the substrate before the first blob of adhesive hits the wall
Even the best adhesive won’t help much if the background is poor. Before you start, a quick inspection is worth it:
- Remove dust and any loose paint thoroughly
- Prime highly absorbent backgrounds with a suitable bonding primer
- Tap existing tiles to find hollow spots - remove anything loose
- Fill uneven areas and holes with filler to level things out
A sound, clean substrate helps prevent later damage and allows the adhesive to perform at its best.
Common mistakes DIYers can avoid easily
The same issues crop up again and again - and they’re simple to eliminate if you know them in advance:
- Spreading adhesive over too large an area at once - it starts to skin over before tiles are placed.
- Working without tile spacers or a levelling system - joints end up inconsistent.
- Skipping the spirit level - judging by eye is rarely accurate.
- Pushing tiles hard into corners - movement joints (silicone) get forgotten and stress builds.
Taking a moment to keep these points in mind saves a lot of rework later - and helps you keep your patience intact.
Why the extra effort really pays off
A neatly tiled wall can last for many years, often decades. In bathrooms and kitchens especially, every extra planning and working step is worth it. Combining a stable adhesive, mechanical support from a timber batten and careful adhesive technique not only prevents tiles slipping - it also improves the final look: even joints, straight lines and a calmer overall finish.
Once you’ve got this approach into your routine, you’ll usually feel confident tackling other projects too: a tiled shower niche, a splashback behind the basin, or a decorative tiled feature wall in the hallway. Using the same method - batten, C2 adhesive, double-spreading and patience - all of these areas can be completed securely and with far less stress.






Comments
No comments yet. Be the first to comment!
Leave a Comment