
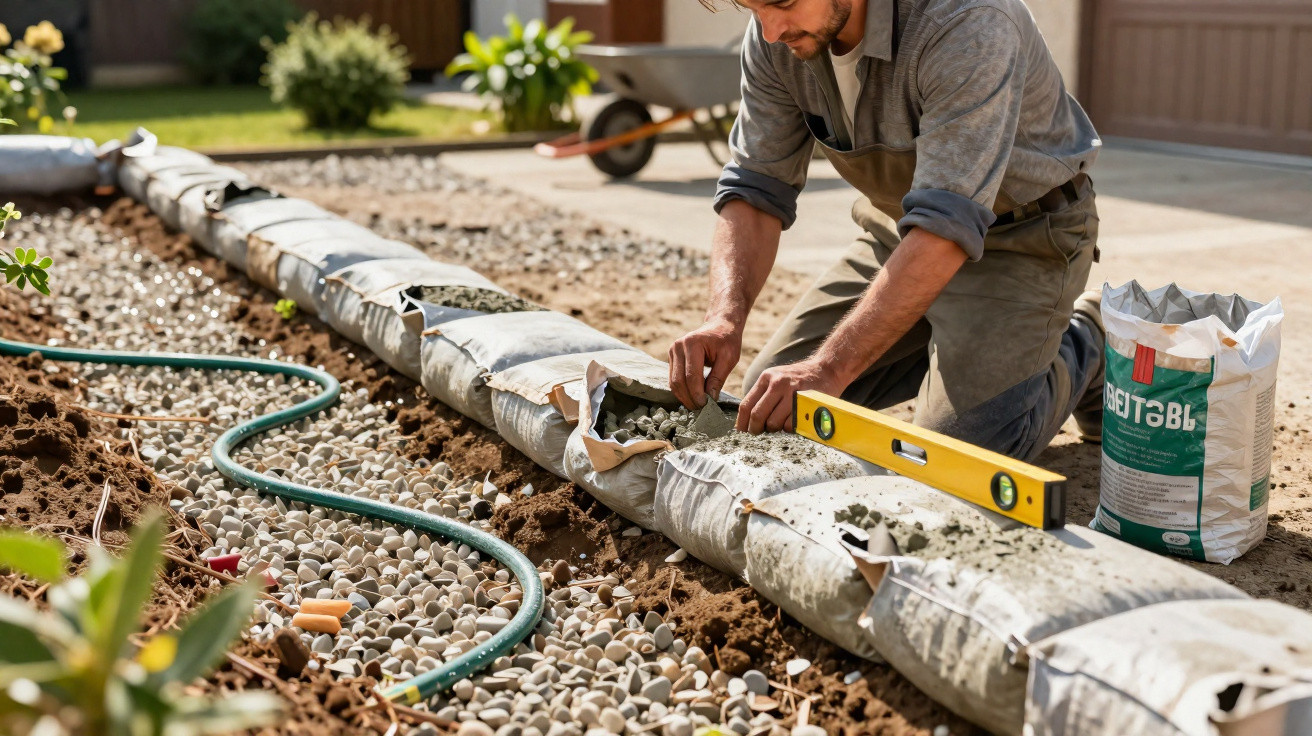
Many homeowners end up at their wits’ end with the driveway: gravel constantly migrates into the grass, the edge looks ragged, and paving stones can blow the budget fast. A technique doing the rounds on DIY forums sounds odd at first, yet the finished look can be remarkably close to a professional job: edging made from ordinary bags of ready-mix concrete straight from the builders’ merchant - no mortar tub, no formwork, no bricklaying experience.
Why the edge of your driveway matters so much
People pulling up outside a house notice the driveway first. In practice, the surface matters less than the boundary. A crisp line looks tidy, structured and high-quality. A frayed transition into the lawn sends the opposite message: instinctively, it looks like nobody is really on top of it.
On a gravel driveway, the edging has several jobs:
- It keeps the gravel where it belongs.
- It stops the lawn gradually “creeping” into the driveway.
- It limits erosion during heavy rain.
- It makes sweeping and using a leaf blower or sweeper far easier.
A lot of people automatically reach for concrete kerbs or block edging. They do look smart, but they usually need a properly prepared base, plenty of labour, and often a noticeable chunk of cost. This is exactly where the concrete-bag method comes in.
"The idea: pre-filled bags of ready-mix concrete are not opened; instead they’re laid in the ground like building blocks, dampened - and they cure in place into one continuous concrete edge."
How concrete bags turn into a solid kerb edge
Typically, bagged ready-mix is used for post holes, small pad foundations or minor retaining work. Some inventive DIYers have pushed it further: the bags are lined up like a string of beads along the gravel driveway, then once cured they become a single, uniform, gently rounded border.
Visually, the set blocks can resemble large natural stones. At the same time, you get an unbroken line that frames the driveway like a border. The result catches many people off guard, because a modest amount of material can transform the overall look of the front drive.
Costs and effort compared
| Option | Material costs (rough range) | Difficulty level |
|---|---|---|
| Block paving or kerb stones | Medium to high | More demanding; lots of cutting and careful setting out |
| Concrete-bag edging | Low to medium | Achievable for beginners; mainly hands-on work |
In North America, a bag of ready-mix concrete weighing around 22–23 kg typically costs between four and eight dollars. Comparable products in Germany sit in a similar bracket, depending on brand, area and promotions. For a shorter driveway, a dozen bags is often enough; for long approaches you obviously need to scale up. Even so, the workload is still noticeably lower than laying traditional kerb stones.
Choosing the right material: not just any cement
For this to work, the details matter. You need ready-mix concrete - a dry blend of cement, sand and aggregate that only requires water. Straight cement on its own doesn’t suit this approach: it has no aggregate and can become brittle.
Also important:
- Paper bags with no plastic coating, so the outer layer can break down later.
- A consistent bag size, ideally 40 or 50 pounds (or the closest size in kilograms available).
- Weather-resistant ready-mix rated for outdoor use.
For tools, you’ll want a garden hose, gloves, safety glasses, a tightly stretched string line, a spade, and ideally a rubber mallet or a scrap of timber to press and shape the bags.
Preparation: the ground determines how long it lasts
Dropping the bags straight onto the lawn may save time today, but it usually causes frustration later. The edge can sink, lean or crack. A small, simple base pays off.
DIYers commonly approach it like this:
- Set the line of the edging using stakes and string.
- Dig a trench along the line, a few centimetres deeper than the bag height.
- Lightly compact the soil, for example with a hand tamper.
- Add a thin layer of gravel and tamp it down to improve drainage and frost resistance.
The aim is to seat the bags securely, slightly below the surrounding level. That way, once the concrete cures, the blocks support one another without being pushed sideways.
Laying the concrete bags, watering, and shaping
When you start placing the bags, how they’ve been stored in the merchant can matter. During transport and handling, finer particles often settle towards the bottom of the bag. If you turn the previous underside upwards, the face that ends up visible can look more evenly mixed.
In the trench, place the bags tight together with as few gaps as possible. Then comes a small but key step: use a knife or screwdriver to punch several holes into the top of each bag. This helps water penetrate and reach the full mass inside.
Next, set the hose to a moderate flow and wet the bags evenly until the paper is fully soaked. You’re aiming for a thoroughly damp mix, not one that’s floating. If you dump too much water on at once, fine cement can wash out and the surface can bleed.
While the bags are still soft, you can gently press them into shape using your foot, a board, or a rubber mallet. This creates slightly rounded edges instead of sharp corners. If you want an especially straight run, keep checking the line with a straightedge - or simply sight along the taut string.
Drying time, load-bearing strength, and upkeep
After about a day, the blocks usually feel firm and can cope with foot traffic. Concrete only reaches full compressive strength after roughly 28 days. During that curing period, drivers shouldn’t treat the fresh edge as something to drive over, otherwise fine cracks can form.
The paper bag breaks down gradually in the weather. If you want to speed things up, carefully remove remnants with a pressure washer once the concrete has set sufficiently. That also helps the textured, stone-like surface show through.
A practical bonus: if a section goes wrong, you can dig out a single block with a spade and some effort, then reset it. That makes this approach more forgiving than stones bedded in mortar.
Common mistakes - and how to avoid them
Too little ground preparation
If the base isn’t compacted, or the bags are only half-buried, you may end up with leaning blocks and stress cracks later. In areas that see frost, the ground repeatedly expands and contracts. A thin, compacted gravel layer works as a buffer.
The wrong concrete mix or plastic bags
Straight cement, or mixes without aggregate, are more likely to crack. Plastic packaging, meanwhile, slows water absorption and won’t rot away. The concrete then sits inside a film-like sleeve that eventually tears and looks untidy.
Too much water in one go
A hard jet or prolonged flooding can wash components out of the mix. It’s safer to wet moderately several times rather than trying to do it all at once.
Decorative ideas and useful add-ons
Even as raw concrete, the border looks neat - but it can be improved visually. If you like, sprinkle a light layer of fine decorative gravel onto the still-damp surface and press it in. That can create a more natural-stone impression.
Coloured concrete stains or weatherproof masonry paints are also options, provided they’re approved for exterior use. Let the concrete cure for several weeks first. Between two concrete-bag blocks, you can intentionally leave small gaps and plant low perennials or ground cover; it breaks up the line and creates a softer transition to the lawn.
For heavily used spots - for example where vehicles occasionally roll over the edge - a hybrid approach can be worthwhile: use the concrete-bag edging as the core, and add traditional kerb stones on top of or in front as a sacrificial wear layer. The visual frame stays stable, while replaceable elements take the mechanical punishment.
When this method works - and when it doesn’t
Concrete-bag edging suits private driveways, garden paths, gravel parking areas, or as a border to planting beds running alongside a drive. If you’re planning an extremely showpiece, architect-designed approach for a large property, natural stone or precisely cut concrete units are usually the better match.
On sloping ground with strong water run-off, or on very soft subsoil, you may need extra structure - such as a wider base or a deeper frost footing. If you’re unsure, it’s sensible to ask at a builders’ merchant or speak to a garden and landscaping contractor.
For many typical family homes, though, the concrete-bag trick offers an appealing middle ground: the driveway gains a clean, durable edge, the gravel stays put - and the cost is far easier to live with than fully re-paving the entire drive.


Comments
No comments yet. Be the first to comment!
Leave a Comment