
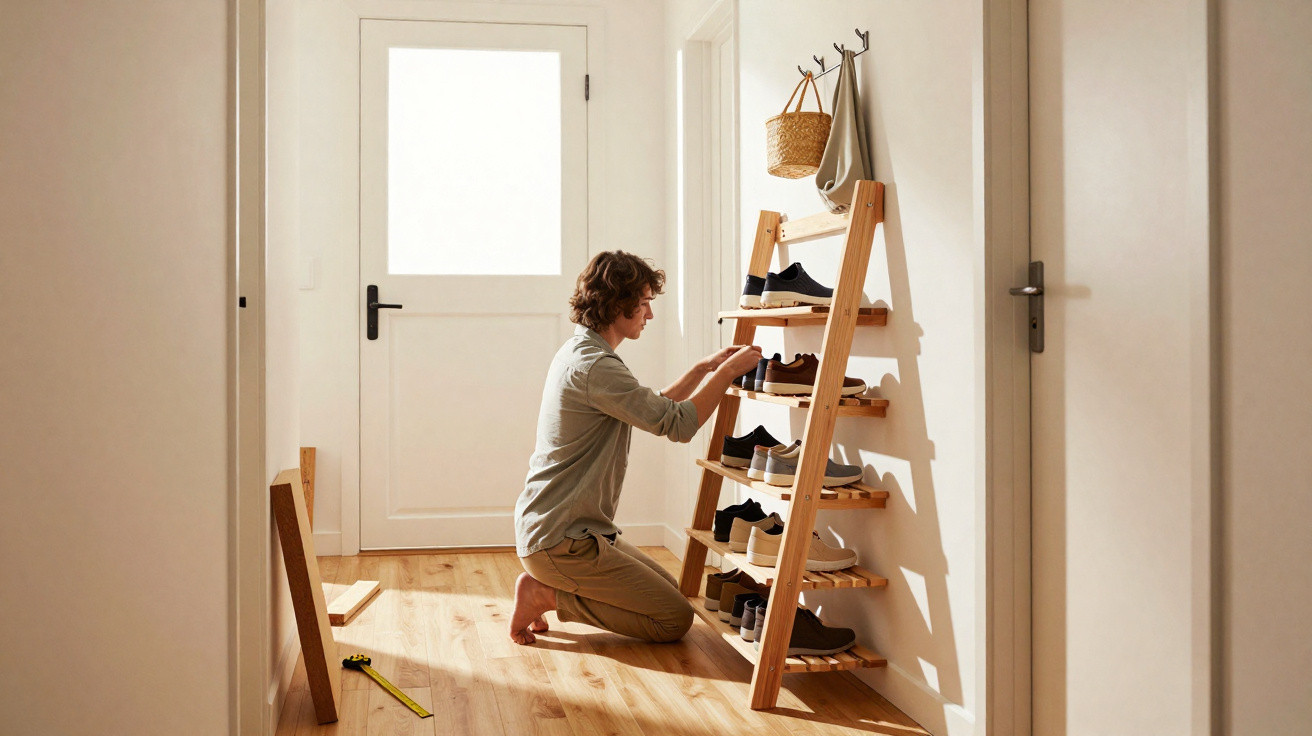
A shoe rack built from leftover timber can bring instant order.
Plenty of people will recognise the moment: you come through the door with shopping bags, a rucksack, or children in tow, and the very first thing you meet is a pile of trainers, boots and kids’ shoes. In narrow hallways or compact flats, that mess quickly becomes a genuine trip hazard. With a few offcuts, a saw and a straightforward plan, you can sort the problem for very little money.
Why a DIY shoe rack completely changes the hallway
Even a handful of pairs left on the floor can, in a corridor only 1 metre wide, swallow up half the usable walkway. It doesn’t just look untidy; it slows you down every time you pass. Arriving home in the dark or with your hands full also increases the chance of a fall.
“A slim rack or a wall-mounted solution lifts shoes off the floor - the tight hallway immediately feels wider, calmer and safer.”
Ready-made shoe cabinets from furniture shops often miss the mark: too deep, too bulky, or simply too expensive. In period properties with narrow entrances or in a small studio flat, every centimetre genuinely matters. That’s where building your own wins: you can set the dimensions, height and number of tiers precisely to suit both the space and the number of shoes.
What makes it even better is that many homes already have suitable material tucked away in a cellar, garage or loft. Old shelving boards, spare roof battens, pallet timber or leftover beams are ideal. It’s upcycling instead of buying new - and it’s close to free.
The basic idea: furniture from scrap wood instead of an expensive shoe cabinet
The approach is straightforward: use offcuts to create either a slim freestanding rack or a wall-mounted version. Both options are designed to be shallow - around 15 to 20 centimetres deep. That’s enough for trainers, low shoes and many boots, while taking up very little hallway space.
- Shoes are no longer in the way; they sit on fixed levels.
- The floor stays clear, making cleaning much easier.
- Every household can plan the height, width and number of tiers to match their needs.
- The timber gets a second life instead of ending up with bulky waste.
If you’ve got thicker structural timber left over, a ladder-style rack works well; if you mainly have boards, a classic freestanding unit or a wall rail with shelves is the better route. Neither option requires a professional workshop.
Freestanding rack from boards: stable, slim and quick to make
Wide boards of roughly 15 centimetres are perfect. They become two side panels plus several shelves. Even three tiers can hold far more than you’d expect: everyday shoes at the bottom, sports shoes in the middle, and boots or rarely worn pairs at the top.
How to build the simple basic frame
For a compact three-tier rack, the layout below works well:
- Cut two side pieces to size, around 80 to 100 centimetres tall.
- Cut three shelves; set the width to whatever your hallway allows.
- Fix the lowest shelf a few centimetres above floor level.
- Mount the second shelf halfway up, and the third nearer the top.
If you like, angle the shelves slightly forwards (around 20 degrees). That encourages shoes to slide back towards the wall, keeps the toe ends slightly raised and makes pairs easier to see. It also helps keep the walkway clear because nothing sticks out.
For joints, long wood screws are a much better choice than nails. Screws pull everything tight, reduce wobble and will easily cope with heavier boots. A cordless drill/driver is all you need.
“Well-planned spacing between levels saves space: for trainers, around 18 to 20 centimetres is enough; for ankle boots, closer to 22 to 25 centimetres.”
Ladder-style frame from leftover beams: tough and adaptable
If you have 2×4-style beams (square-section timber with a similar profile), you can build an especially sturdy frame. The design is like a small ladder: an upright frame on the left and right, with angled “rungs” between them that support the shoe platforms.
Angled frame to make the most of shallow depth
Each side is made from two vertical beams. Between them, you attach angled crosspieces. Cut the ends of these pieces at roughly a 70-degree angle so the support surface tilts slightly back towards the wall. The shoes then sit securely, even though the rack stays very shallow.
On each crosspiece, fix three narrow slats running front to back, leaving small gaps between them. This creates a light, strong platform. Moisture won’t pool - a real advantage in winter when shoes come in wet.
- Materials: square-section timber, narrow boards or slats, wood screws
- Tools: saw (a mitre saw makes the angles easier), cordless drill/driver, tape measure, pencil, spirit level
- Optional: sandpaper or a random orbital sander to smooth edges
If you’ve got children at home, or a pet that tends to barge into furniture, it’s sensible to anchor the frame to the wall. A small angle bracket at the top is often enough to prevent tipping.
Wall-mounted rack with adjustable levels: ideal for tiny hallways and the garage
For very tight entrances or a narrow corner in the hallway, a system fixed directly to the wall can be the best solution. Short wooden pieces - like small brackets - support square or rectangular shelves.
Building an adjustable wall system
Cut short segments from narrow boards, about 25 centimetres long. Screw these to the wall in pairs at exactly the same height, creating supports for small panels - for example, shelves measuring 25 × 25 centimetres.
Accuracy matters here:
- Use the spirit level to draw the first horizontal line on the wall.
- Fit the first row of supports along that line.
- Mark each additional row about 2.5 centimetres higher, until you reach the height you want.
In a garage, you can start the first row a little higher off the floor so children’s bikes, scooters or a pushchair can slide underneath. At the same time, shoe soles won’t sit directly on damp concrete.
“The big advantage of adjustable levels: tall boots, small children’s shoes and trainers can all fit at once, without wasting valuable air space.”
Safety, comfort and finishing touches: small details that make a big difference
In narrow corridors, safety matters twice as much. Your rack should be stable and free of sharp edges. A quick check before you start using it will save hassle later.
- Lightly sand all exposed edges to avoid scratches on shoes and legs.
- Choose wall plugs suitable for your wall type (plasterboard, concrete, brick).
- Add anti-tip protection to taller racks, such as an angle bracket or strap.
- Pair the rack with a mat or wipe-clean tray for wet zones by the door.
If you want, treat the scrap wood with oil or a wood stain. Pale stains can make small hallways feel larger, while darker tones often suit industrial or loft-style interiors better. A deliberate colour accent - a bold rack in an otherwise white hallway, for instance - creates a focal point and distracts from a tight floor plan.
How many shoes will it really hold - and what should you bear in mind?
A narrow hallway doesn’t need to store every pair in the household. A clearer approach is to split storage: everyday and seasonal shoes by the door, and rarely worn pairs in the bedroom or cellar. That keeps the entrance area manageable.
A rough guide for planning:
| Shelf width | Pairs per level | Suitable for |
|---|---|---|
| 60 cm | 3–4 | Single person or couple |
| 80 cm | 4–5 | Small family |
| 100 cm | 5–6 | Family with several children |
With three tiers, an 80-centimetre rack typically holds around twelve to fifteen pairs - usually more than enough for day-to-day use.
Practical add-ons: hooks, baskets and smart combinations
If you plan ahead while building, it’s easy to extend the idea. You can fix hooks under the shelves for house keys or dog leads. On one side, two strips and a base plate can form a slim umbrella stand. Small baskets slotted between shoes are handy for hats, gloves or shoe-care products.
In rented homes where major alterations aren’t possible, a modular piece like this gives maximum impact with minimal disruption. When in doubt, choose a freestanding rack that can move with you when you leave. And if you do drill into the wall, keep fixings to a minimum and place them carefully - it makes filling and touching up later much simpler.
If DIY feels daunting, begin with a mini version: a two-tier rack just for children’s shoes or sports pairs. The same principles apply at a smaller scale, and with a bit of practice you can build up step by step to a made-to-measure solution for the whole entrance area.





Comments
No comments yet. Be the first to comment!
Leave a Comment