
With one straightforward trick, you can stop it happening for good.
If you are freshening up the bathroom or kitchen in spring, wall tiles quickly come into the picture. Visually they are a big win, but fixing them to a wall can be surprisingly stressful. Many DIYers have seen it: the tiles are lined up perfectly-then, minutes later, they begin to creep downwards, the grout joints shift, and the pattern starts to look skewed. With proper preparation, the right adhesive, and a simple wooden batten as a support, you can eliminate this problem once and for all.
Why wall tiles start slipping in the first place
Wrong tile adhesive or the wrong consistency
Most of the time, the tiles are not to blame-the adhesive is. If you add too much water to a powdered adhesive, you end up with a mix that is overly runny. It spreads easily, but it has very little initial grab on the wall. The tile is not properly “held” in the adhesive bed, so its own weight makes it slowly drift down.
The amount you apply can cause issues too. Putting on an excessively thick layer might feel like “more must be better”, but in reality it often creates a slick film. Instead of bonding firmly to the wall, the tile is effectively sitting on a slippery cushion-and gravity does the rest.
"The ideal adhesive mix feels like a mouldable, stable paste: it stays on the trowel without slumping."
What matters is following the manufacturer’s instructions precisely-mixing ratio, resting time, and working time. If you mix “by feel”, you often end up with tiles that slip and grout lines that vary.
You need the right mortar/adhesive
For wall tiling, a flexible thin-bed cement-based adhesive rated C2 is recommended. This classification indicates improved adhesion strength. On a wall-where tiles do not simply sit under their own support as they do on a floor-you will notice the difference immediately. Also check the stated open time on the bag: it should be at least 20 minutes.
In practical terms, that means the adhesive stays workable for that period after you spread it, without losing bonding performance. You can still align tiles without them instantly locking in place-or, at the other extreme, sliding off completely.
As a second aid, levelling or tensioning systems are worth considering. Self-clamping clips and wedges keep grout joints consistent and mechanically lock neighbouring rows together. This helps prevent a heavy tile from slowly dragging the row beneath it downwards.
The wood batten trick: how to stop any tile slipping reliably
Why you should never start with the bottom row
A common approach is to begin straight off the floor or on the kitchen worktop. That is exactly where a classic mistake hides: floors and worktops are rarely perfectly level. Even a 1 mm difference across the width of a wall can throw the entire layout out. The higher you tile, the more noticeable that offset becomes.
The smarter method is to deliberately begin with the second row. You fit the first (lowest) row at the very end, once the rest of the tiled area is stable and true.
How to fit the wooden batten correctly
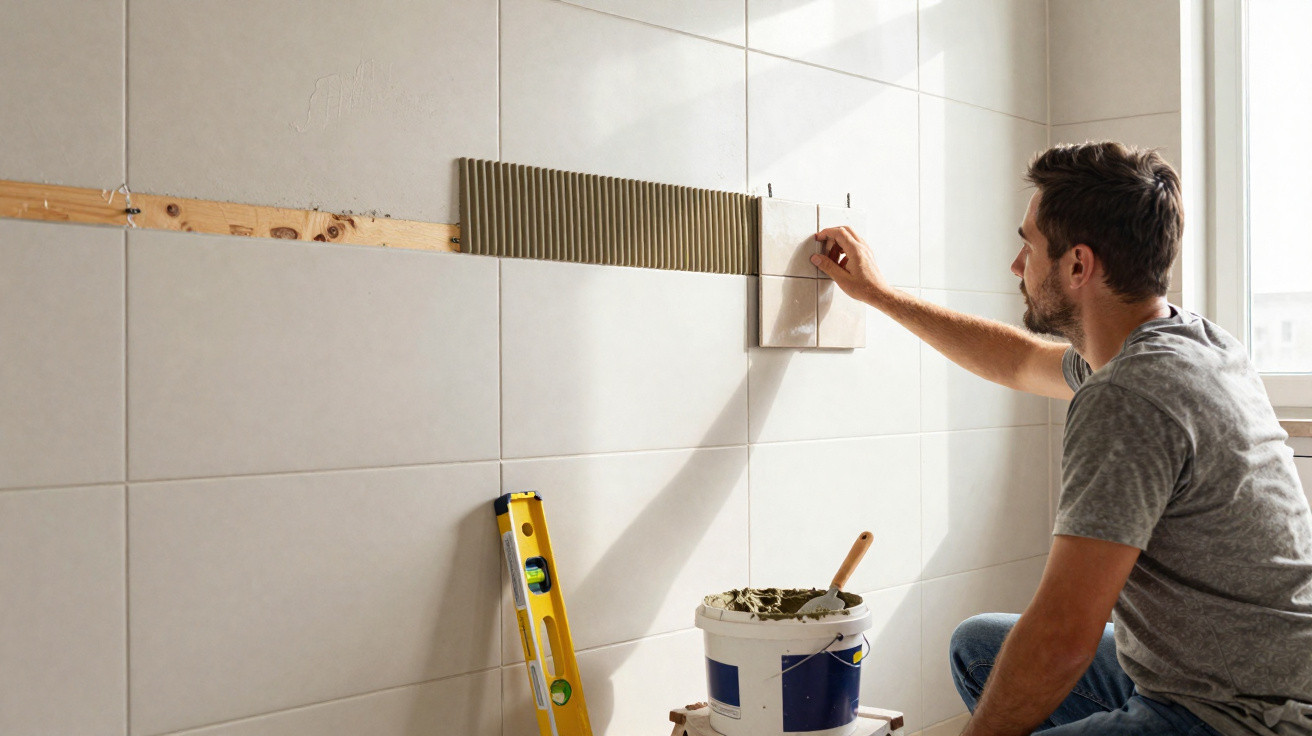
So the second row is not left “hanging”, you use a simple support: a straight wooden batten (also called a timber strip or ledger). It acts as a temporary shelf.
- Use a spirit level to mark a perfectly level line on the wall.
- Fix the batten exactly along this line with screws.
- Set the height so that the bottom edge of the second row of tiles will sit directly on the batten.
When you start tiling, the tiles rest on the batten. This stops the rows from gradually sagging. At the same time, it gives you a reliable reference for a dead-straight grout line.
"The wooden batten works like an invisible scaffold: it supports the weight of the tiles until the adhesive has fully cured."
Professional method: double buttering for maximum grip
Why one layer of adhesive is often not enough
With larger formats or heavier porcelain stoneware tiles, a double-application method is advisable. You apply adhesive both to the wall and to the back of the tile. This reduces voids that can weaken the bond and later lead to cracking or hollow-sounding tiles.
Step by step: how to do a double application
For most wall tiles, a notched trowel with 6 mm teeth is suitable. The process is as follows:
- Spread adhesive over the wall in a full, even layer.
- Comb it with the notched trowel to create uniform ridges running in one direction.
- Apply a thin coat of adhesive to the back of the tile.
- Comb ridges on the tile at right angles to the ridges on the wall.
- Press the tile firmly into place and slide it slightly back and forth until it sits cleanly.
Because the ridges form a cross pattern, pressing the tile in creates a suction effect similar to a suction cup. Air is pushed out at the sides and the adhesive beds in across the whole surface. This improves hold and lowers the risk that a corner later sounds hollow or comes loose.
The right moment to fit the bottom row
Patience pays off
Once the upper area is tiled, it is tempting to carry on immediately and remove the batten. This is where the final major mistake often happens: if you undo the batten too soon, the adhesive may not have set fully and can still give. The entire field can shift slightly, grout joints move, and individual tiles suddenly “settle”.
A good rule of thumb is to wait at least 24 hours before taking the batten off. This aligns with the EN 12004 standard guidance for tile-adhesive curing times. In cool or very humid rooms, allowing an extra day can provide added security.
Now it is time for the bottom row
After the curing period, you can simply unscrew the batten. The tiled area above is now stable and self-supporting. You can then complete the first row directly above the floor, shower tray, or worktop.
This is the point where accurate cuts are often needed to compensate for minor unevenness in the floor or slightly out-of-square edges. A tile cutter and cardboard templates make it easier to plan those cuts. If you take your time here, you can achieve a perfectly straight grout line even when the floor is not.
Checklist: how to keep wall tiles firmly in place
The essentials for a neat, durable result are easy to remember:
- Choose a C2 tile adhesive with sufficient open time.
- Mix the adhesive exactly to the instructions-do not dilute it.
- Start with a wooden batten and begin from the second row.
- Use a levelling system and tile spacers for consistent joints.
- Use double buttering with a notched trowel, especially for large formats.
- Allow at least 24 hours of drying time before removing the support.
Important terms and practical extra tips
What does C2 mean on tile adhesives?
The letters and numbers on an adhesive bag can look like jargon at first glance. In simple terms: “C” means a cement-based adhesive-your typical powder you mix with water. The “2” indicates higher adhesion strength compared with the basic class C1. For wall areas with larger tiles or in damp environments, C2 is the safer choice.
Common mistakes you can avoid
A few simple working habits prevent many problems:
- Do not spread adhesive over an area that is too large at once-the surface can skin over and lose grip.
- Check regularly with a tile that the adhesive still transfers properly to the back (that it is still bonding rather than drying).
- Once a tile is placed, avoid repeatedly lifting it off and resetting it, as this breaks the adhesive structure.
- In wet rooms, always confirm the adhesive is suitable for that environment.
If you follow these points and use the wooden batten method, wall tiling becomes far less daunting. Bathroom or kitchen refurbishment becomes much more predictable, and the likelihood of ending up with a cleanly tiled, visually calm wall increases dramatically.


Comments
No comments yet. Be the first to comment!
Leave a Comment