
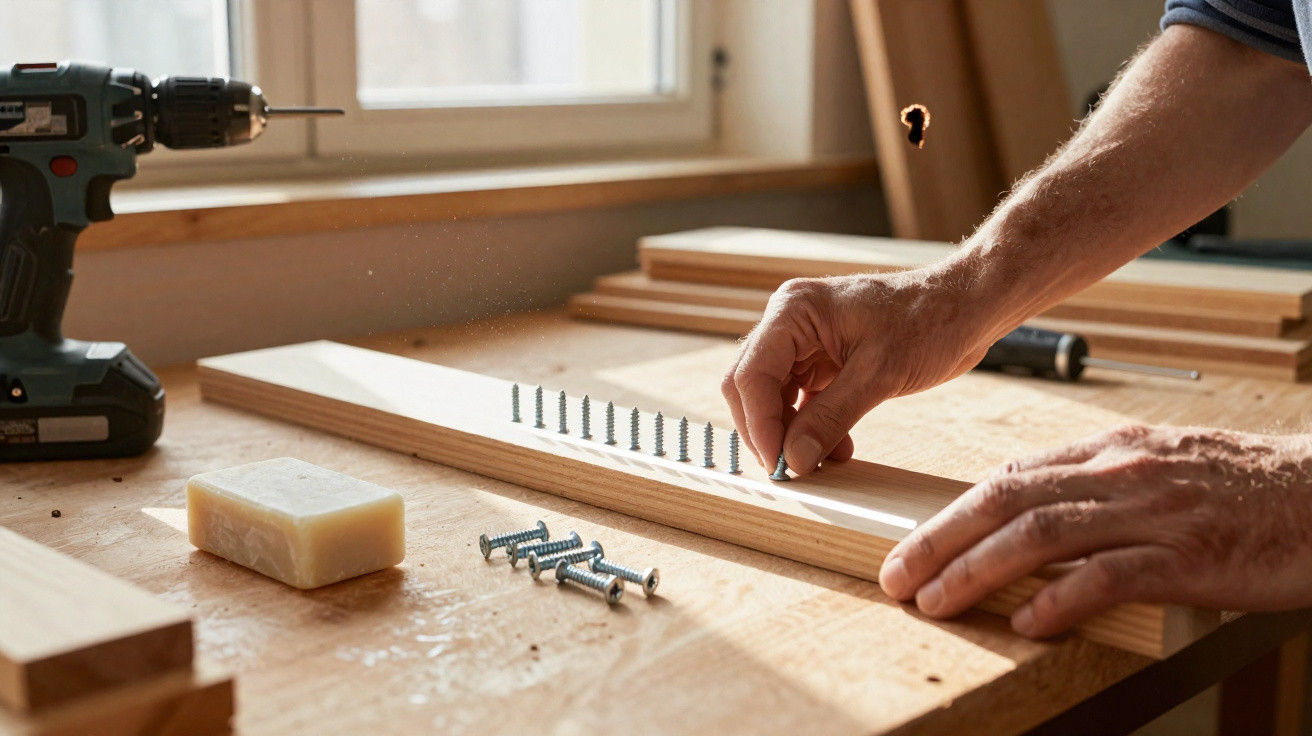
One turn too keen, a fraction too close to the edge, and crack - that smooth face opens up like a zip. A builder once told me there’s a two‑second move that prevents it. No gadgetry. No apps. Just a dry bar of soap and a line you can sketch with your thumb.
I was in a half-finished hallway, heavy with the smell of sawn pine and chalky plaster dust, watching two lads rush a door into place. The foreman - sleeves pushed up, grin on his face - fished a little hotel soap from his pocket, the sort you bring home by accident. He drew it along the grain where the hinge screws would go, then dragged the screw threads across the bar as if he were sharpening a pencil. The driver hummed. No squeal, no chatter, no split. The tea was strong, the jokes were bone-dry, and the timber was greener than it looked. He glanced at me and shrugged, like it was nothing new. Then he named it in a way that stayed with me: the soap line.
Why wood splits - and the quiet fix I learned on site
Wood tends to split when you force it to give way quicker than it can. A screw doesn’t simply “enter” timber; it wedges fibres apart, creates heat and pressure, and drives a route along the grain. Close to an edge, or in dry, brittle stock, that pressure has nowhere left to go. The soap line trick slips underneath the fuss. Reduce friction on the threads and at the surface and you need less torque, which means less wedging, less heat, and fewer nasty surprises. It’s like taking a breath before you push.
I first watched it work on softwood, on a door lining that had been rained on and then baked dry in a skip. The sort that looks fine right up until a screw kisses the edge and it explodes. One piece - no soap, no pilot - split like a breadstick. The next piece got a soap line along the grain and a quick pass of the screw across the bar, same driver speed, same fixings. It went in like a spoon through warm cake and the face stayed unbroken. Not magic - just less battle between steel and wood.
Underneath it all, it’s straightforward physics in work boots. Friction on the threads turns your effort into heat, and that heat dries and tightens fibres as you drive, which increases the wedge effect and raises the odds of a split. Soap cuts that drag, so the screw’s shank has to displace less timber and the threads tear fewer fibres as they bite. Soap reduces friction, and friction is what turns a neat screw into a tiny crowbar. There is a caveat: soap can draw in moisture and doesn’t suit every job. For anything long-term, beeswax or candle wax is usually the gentler choice, but the site trick proves itself because it’s available exactly when you need it.
How to do the soap line trick (without wrecking your timber)
Choose a plain, hard, dry bar - those little white hotel soaps are ideal - and draw a narrow line along the grain where the screw will be driven. Run the screw threads over the bar twice, drill a small pilot if you’re close to an edge, then drive the screw slowly and steadily. As the head seats, pause briefly, add a quick countersink if it’s required, and finish with a controlled press rather than a shove. A dry, plain bar and a light hand - that’s all there is to it.
Where do people go wrong? They load on too much soap, use a damp bar, or reach for scented glycerine soap that stays sticky and can mark pale timber. Others skip the pilot in hardwood, then blame the screw when the edge starts to lift. In reality, nobody gets it perfect every day. Match the screw to the job, keep at least a thumb’s width from the edge, and slow down. If you’re working outdoors, or you’re in oak with iron screws, use beeswax instead to avoid rust and dark staining.
A carpenter with fifty winters in his hands put the same idea far more plainly:
“If it squeals, it’s begging for soap or a pilot. Give it one.”
Keep this little crib sheet in mind next time the timber looks like it’s on a hair-trigger:
- Near an edge? Drill a pilot hole roughly 70% of the screw’s core in softwood, 85–90% in hardwood.
- Going into end grain? Soap helps, but a snug pilot and a countersink help more.
- Working outside? Use wax and stainless screws; keep soap for indoor, short-term fixes.
Take it with you to the next job
Good habits pack lighter than tools. The soap line trick is the sort of move that shows up in your pocket on a wet Tuesday and quietly saves you half an hour - and a few choice words. It nudges you to pay attention to the grain, your edge distance, and your pace, letting timber behave like timber. Everyone knows the feeling: a job is going smoothly until one hurried screw ruins the rhythm. A bar of soap isn’t glamorous, but it’s a reminder that most splits begin with haste, heat, and ego. Small, learnable habits are what separate a bodge from proper craft. Pass it on to a neighbour, show it to a kid gripping their first screwdriver, or keep a little bar in your kit beside the spare bits. The work feels easier, and the wood tends to forgive more.
| Key point | Detail | Benefit for the reader |
|---|---|---|
| Soap line + soaped threads | Draw a dry line along the grain and run the threads over a plain bar | Faster driving, less splitting, cleaner finish |
| Pilot and pace | Small pilot near edges; drive slowly with a brief pause as the head seats | Less wedging and reduced face blow‑out |
| Pick the right lubricant | Soap for quick indoor jobs; beeswax/candle wax for long-term or exterior work | Helps prevent rust and staining, keeps joints sound |
FAQ
- Does soap really stop wood from splitting? It reduces friction so the screw needs less force, which lowers the wedging that causes splits. It won’t fix everything, but it does help.
- Is wax better than soap? For exterior work or anything meant to last, yes. Wax isn’t hygroscopic and is generally friendlier with metals and tannin-rich timbers.
- Do I still need a pilot hole? Yes - near edges, in hardwood, or with larger screws. Soap works alongside a pilot hole; it doesn’t replace it.
- What kind of soap should I use? A plain, unscented bar that’s dry and hard. Avoid soft glycerine bars that can gum up and stain.
- Will soap rust my screws? It can encourage moisture. Use stainless fixings or swap to beeswax if corrosion or staining is a risk.




Comments
No comments yet. Be the first to comment!
Leave a Comment