
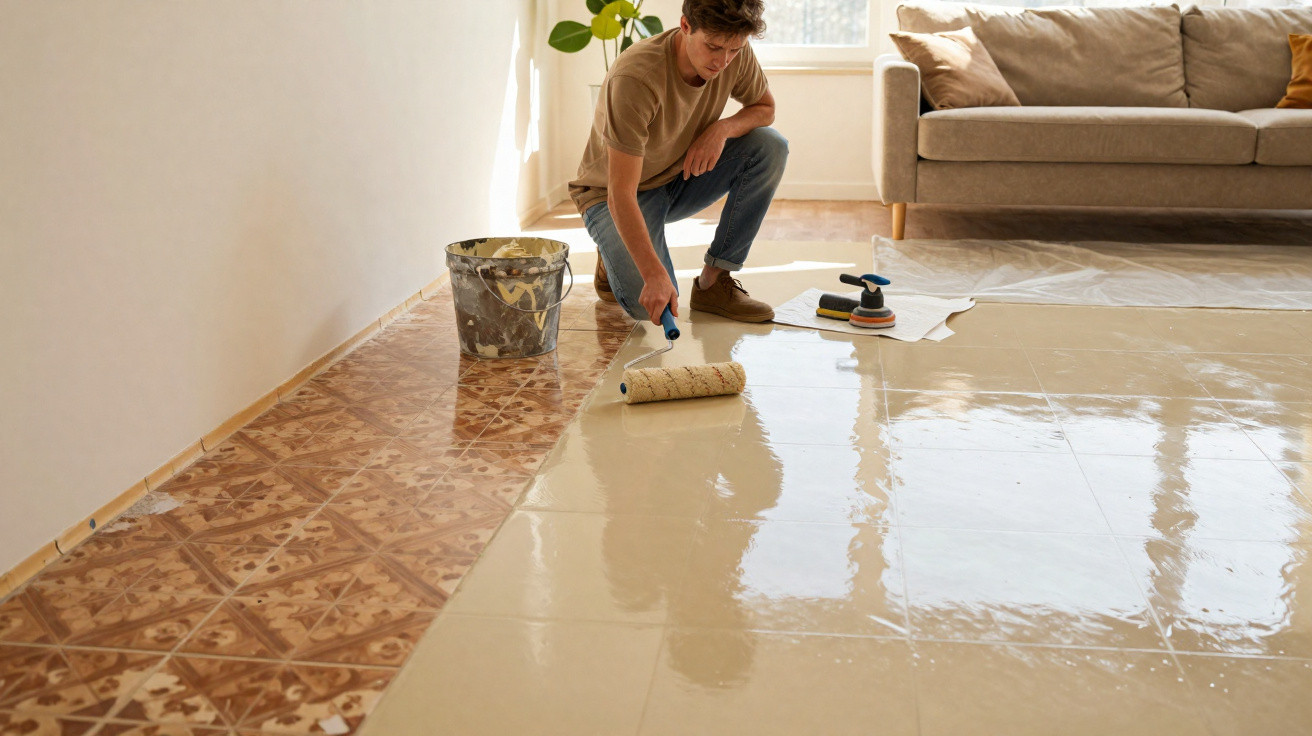
Many flats only feel dated because of an old-fashioned tiled floor - and these days you can change that without any hacking out.
Anyone who has ever ripped out old tiles knows the nightmare: dust everywhere, constant noise, days of disruption at home, and a budget that keeps creeping up. Yet there’s an approach that lets the existing floor stay exactly where it is - while still looking like it’s had a full makeover.
Why a new floor without demolition makes such a difference
In plenty of homes you’ll still find beige, brown or small-format tiles that are technically sound, but visually scream the 1990s. Floors like that can drag an entire room down, no matter how modern the kitchen, furniture or lighting may be. That’s why many owners and tenants keep postponing a refurb: they simply don’t want building work disrupting daily life.
Ordinarily, fitting a new floor means chipping up tiles, hauling away piles of rubble, repairing the screed and then laying the new finish. It takes time, drains your energy and costs serious money. If you’ve only just moved in, or you’re working to a modest budget, you’ll naturally look for something quicker and cleaner.
“The smart shortcut: the old tiled surface stays down, but gets fully covered - including the grout lines.”
That’s where a specialist floor covering comes in - one that’s applied directly over the existing tiles. Its big advantage is a seamless finish: it looks uniform, calms the room visually and instantly feels more contemporary. At the same time, you avoid all the stress of demolition.
Resin flooring instead of tile chaos: how the system works
The key is floor resin, typically based on epoxy or polyurethane. The material is applied as a liquid and levels out over the old tiles to form one continuous layer. The grout lines disappear, the tile pattern no longer shows through, and you end up with an even surface - similar to what you see in modern lofts or designer bathrooms.
There’s also a surprising amount of choice in colour: from warm stone-like shades to cool concrete greys and crisp whites. If you prefer, you can opt for a matt, satin-matt or glossy finish. That makes it suitable for everything from a family kitchen to a minimalist living room or a stylish bathroom.
Another plus: resin creates a closed, water-repellent layer. When it’s applied properly, the surface is tough, copes well with splashes, and scratches tend to appear far less often than with many paints or basic coatings.
Benefits of a resin floor over old tiles
- Seamless surface: no dirt collecting in grout lines, easier cleaning
- Water resistant: ideal for bathrooms, kitchens, cloakrooms and utility rooms
- Flexible look: matt, satin-matt or glossy, with many colour options
- Faster to complete than removing tiles altogether
- Long-lasting, provided the substrate is prepared professionally
When a resin floor over tiles is genuinely suitable
As appealing as it sounds, not every tiled floor is automatically a good candidate. The substrate has to meet a few requirements - otherwise the “quick fix” can cause problems later.
The most important points:
- Stability: tiles must not sound hollow or move.
- Cleanliness: the floor must be thoroughly cleaned and degreased.
- Dryness: no moisture issues in the substrate.
- Evenness: grout lines and minor damage are levelled in advance.
Loose tiles are a real hazard. If they come free later, the resin layer above can lift or crack as well. If a tap test reveals hollow spots, those areas should be stabilised first - or replaced if necessary.
“Only a sound, clean and dry substrate is the basis for a floor that looks good and lasts for years.”
Very smooth, glossy tiles usually need a special primer. This helps the resin bond properly so it doesn’t later detach in flakes.
How the preparation works step by step
The visible part - pouring the resin - often takes only a few hours. The real work lies in the preparation. If corners are cut here, you may pay for it later with cracks, bubbles or an uneven appearance.
- Thorough cleaning: remove dust, grease and old care-product residues.
- Check the tiles: tap test, repair or replace any loose tiles.
- Level the grout lines: fill depressions so the surface is as even as possible.
- Apply primer: a dedicated bonding layer, depending on tile type.
- Pour the resin layer: spread evenly and roll out air bubbles.
This groundwork is what determines whether the final result looks like a premium, continuous finish - or more like a stopgap.
DIY or hire a professional - what’s more realistic?
For small rooms with simple shapes - a cloakroom or a compact kitchen, for example - a DIY project can be feasible. Ready-to-use kits are available from around 18 Euro per square metre. They typically include primer, resin and sometimes a sealing coat.
However, materials alone aren’t enough; you’ll also need a bit of confidence. Resin has a limited working time. If you move too slowly, you risk lap marks or visible joins. Air bubbles need removing with a spiked roller, and the layer thickness has to be kept under control.
“If you’re confident with a brush and roller and follow the instructions precisely, you can tackle smaller areas yourself - for larger rooms, a specialist company is usually worth it.”
For large living rooms, full bathrooms or open-plan kitchen-living spaces, many people prefer to bring in professionals. Depending on the system and finish, costs typically fall somewhere between 100 and 150 Euro per square metre. That price includes not only the labour, but also the expertise around correct layer thickness, the right texture and slip-resistant options.
Which look suits which room?
Choosing resin flooring also means making a few design decisions. The finish should look good - but it also needs to suit how the room is used.
| Room | Recommended finish | Special point |
|---|---|---|
| Bathroom / shower | matt or satin-matt, slip-resistant | greater safety when wet |
| Kitchen | satin-matt, neutral tones | less sensitive to stains, easy to clean |
| Living room | satin-matt or slightly glossy | calm, elegant surface effect |
| Hall / entrance | hard-wearing, more on the matt side | disguises dirt marks visually |
If you’re unsure, ask to see sample boards or try the colour on a small area - for instance in a storage cupboard or behind where a piece of furniture will sit.
How to care for the new floor properly
Day to day, one major benefit quickly becomes clear: cleaning is simpler. With no grout lines, there’s nowhere for limescale or grease to lodge. A soft mop, lukewarm water and a mild cleaner are usually all you need.
On the other hand, abrasive scouring products, aggressive solvents and very stiff brushes can damage the surface. Avoiding those will significantly extend the floor’s lifespan. In heavily used areas, it may be worth applying a fresh seal after a few years so the finish looks newly poured again.
What to consider before deciding
Floor resin noticeably changes a room’s character. The result looks more modern and calmer, often with a slightly “industrial” feel compared with classic timber flooring or porcelain. If you prefer a cosy, country style, you can work with warmer shades or gently mottled effects to give the surface more life.
It’s also important to think about height: the new layer adds a few millimetres. Doors still need to open freely, and transitions between rooms shouldn’t become trip hazards. In many cases this is easy to manage, but it’s best to factor it in early.
As a rough guide, it’s worth taking stock of your wider plans: if bigger upgrades are due anyway - electrics or a bathroom overhaul, for example - resin flooring can be one part of the overall project. For anyone who simply wants to escape the look of old tiles without living on a building site day after day, a seamless finish is often the middle path between a full renovation and a purely cosmetic tweak.


Comments
No comments yet. Be the first to comment!
Leave a Comment